| INDEX | 1300-1599 | 17. JH | 1700s | 1800s | 1900s | CROSS-ERA | ETHNO | |
| MISCELLANY | EARLY MUSIC | CONTACT | SEARCH | |
|
|

 A
chemise is a long shirt (or shift) worn as the innermost layer of 18th century
women's clothing. The basic shape remained the same from the 16th until the
early 20th century. It was the worn by all classes and served as vest, drawers
and nightshirt. 18th century laundry was a multiple-day affair and only occurred
about once a quarter, so if you wanted to change shirts daily you had to have
90 of them. Considering the cost of fabric, even a wealthy townswoman would
probably have preferred to own two or three dozen and wear them for a few days.
Unless it was sweaty hot or those days of the month that's not nearly as unhygienic
as the 18th century is often said to be.
A
chemise is a long shirt (or shift) worn as the innermost layer of 18th century
women's clothing. The basic shape remained the same from the 16th until the
early 20th century. It was the worn by all classes and served as vest, drawers
and nightshirt. 18th century laundry was a multiple-day affair and only occurred
about once a quarter, so if you wanted to change shirts daily you had to have
90 of them. Considering the cost of fabric, even a wealthy townswoman would
probably have preferred to own two or three dozen and wear them for a few days.
Unless it was sweaty hot or those days of the month that's not nearly as unhygienic
as the 18th century is often said to be.
The best fabric for it is white (not brilliantly white) linen, the second-best is cotton unless your persona lives in a region where cotton was forbidden during the 18th century (see 18th century fabrics). Unfortunately, most modern linen fabrics are not nearly as densely woven as their 18th century counterparts. Try to find something resembling (as far as thread count and thickness are concerned) facrics for bed sheets or a better-quality linen blouse.
The higher up the social ladder, the finer and whiter the linen should be. If you're going for a lower class impression, coarser and half-bleached linen is better, but don't choose too coarse a fabric: Although linen can be remarkably soft even though it's called coarse due to thick threads, your nipples may think otherwise and complain. I've overcome that with what may well be a period technique by making the top as far down as the end of the underarm gussets out of medium fine linen and the rest out of coarse fabric, a technique I've seen in a number of 19th century shifts. Sleeves made of a different fabric han the rest of the shift (presumably finer linen) are documented for the 18th century, e.g. by Garsault.
If you consider silk as shift fabric, please read the remarks at the end of the men's shirt page to put you off it.
 |
 |
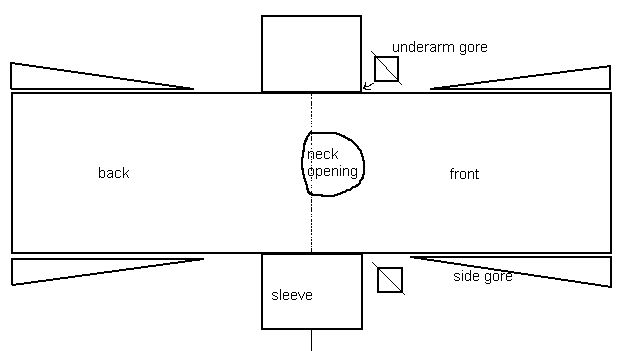
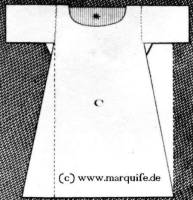
I think it's obvious that the pattern is only a sketch to show you the general make-up. As the chemise consists only of oblong and triangular pieces and doesn't have to fit exactly, making your own is fairly straightforward.
Although spinning machines were being developed and improved throughout the 18th century, most household fabrics and especially the dowry linen bolts were still hand-spun and hand-woven and therefore expensive, so fabric economy played a large role. Due to the working width of a hand loom, most linen was only 60-80 cm wide. That's very good with, economy-wise, and if you're lucky you can still find vintage bolts of something like 72-80 cm in width.
I've made a cutting diagram for the German version of this page, but I'm sure you can guess what each part is.
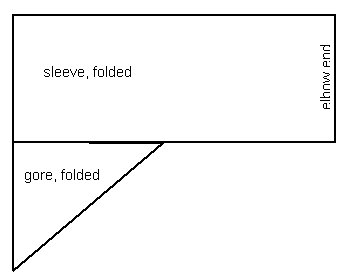
The above is still valid if your fabric is only 70 cm wide: You just turn the sleeves by 90° and make them 35 x 40 cm. It's not a big deal if the side gores are a bit shorter. As I said, they don't have to reach all the way to the underarm gussets. If your fabric is even narrower, less than half your bust width (plus ease), look at the variations at the end of this page. For the above example you'll need a bit more than 3 1/2 metres.
With a modern 150 cm wide fabric, you'll have a lot of waste (=Verschnitt):
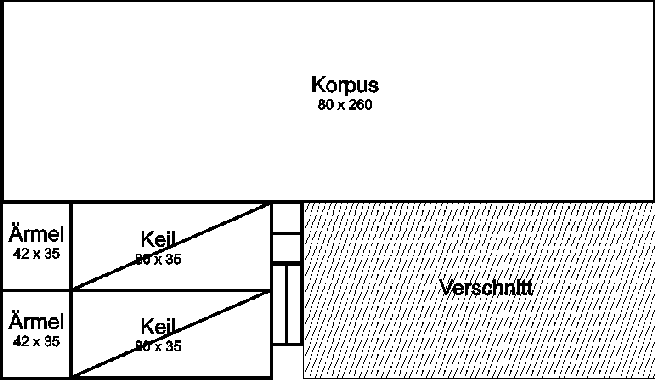
From the fabric economy point of view, it would make more sense to cut two chemises by treating the fabric as two lengths of 75 cm width each and following the diagram for 70-80 cm.
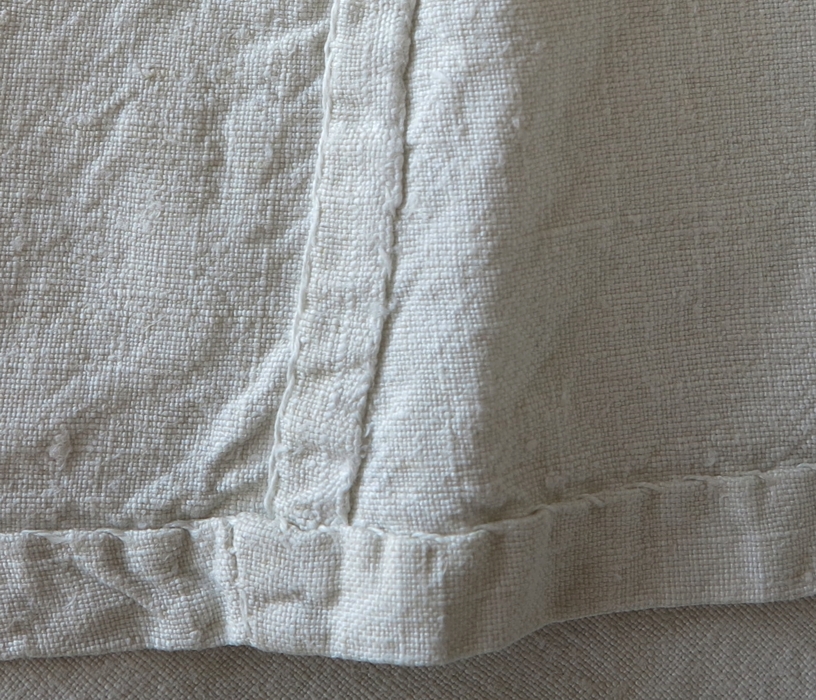
The period-correct seams are flat-felled. French seams are technically possible, but AFAIK not documented. Not neatening the edges is not a period-correct option: The shirt was supposed to survive years of rather brutal washing methods (economy, remember?), and no fabric is that fray-resistant.
 There are
various ways of making up a chemise - this is mine. First I attach one underarm
gusset to each of the sleeves, on one end of the side that's going to be the
seam running down it. Then I fold the gusset diagonally so that one tip points
towards the elbow end, and fold the sleeve down its length. That way, the side
of the now triangular gusset meets the other side of the sleeve seam. Stitch
them together and continue down the sleeve towards the elbow end.
There are
various ways of making up a chemise - this is mine. First I attach one underarm
gusset to each of the sleeves, on one end of the side that's going to be the
seam running down it. Then I fold the gusset diagonally so that one tip points
towards the elbow end, and fold the sleeve down its length. That way, the side
of the now triangular gusset meets the other side of the sleeve seam. Stitch
them together and continue down the sleeve towards the elbow end.
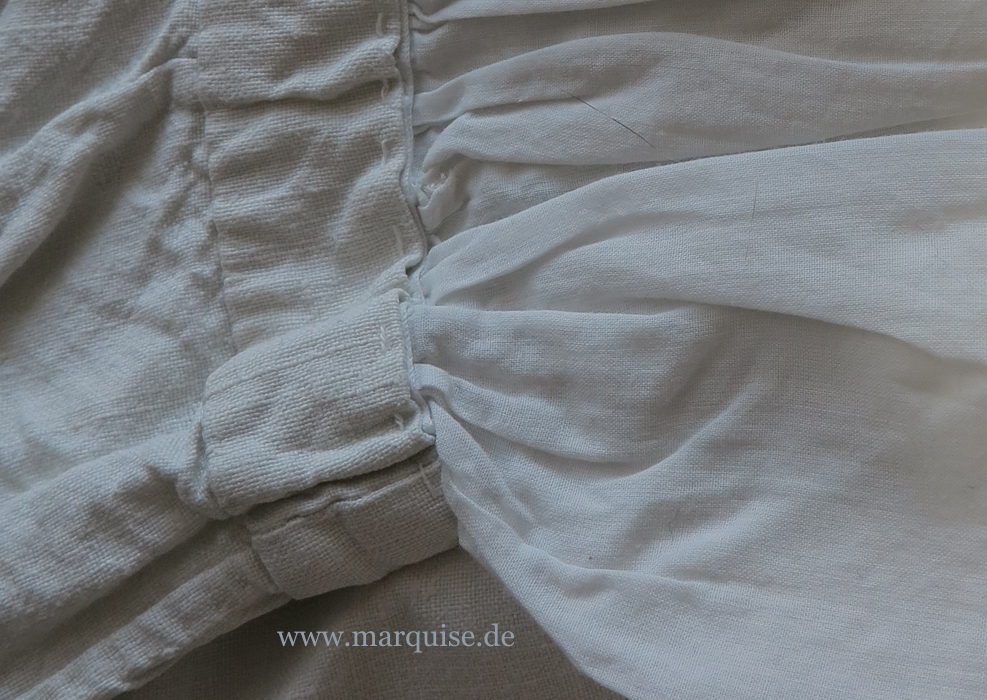
Then attach the four long gores, one to each side of the body, going from the hem up. When that is done, fold the whole thing along the shoulder line and close the side seams down the slanted sides of the side gores. Put the sleeves in the usual way (turned right side out, stuck into the body... you know), then close the side seam the rest of the way between the underarm and side gores. Make up the hem - it helps if you cut the lower ends of the side gores to slightly slant up towards the side, otherwise you'll have problems turning the hem at the corners. Also makes for a straighter hemline. But don't go so far as cutting the hem completely rounded.
The sleeve ends can be made up by simply turning a hem, or by gathering/pleating them into a narrow cuff (preferable).
Now it's time to see to the neckline. The best method is to first cut a relatively small hole into the shoulder line fold and a short slit into the front, just big enough to stick your head through. Put on the stays, straighten the chemise under them, then put on the robe or jacket and have someone mark the neckline as outlined by the corset and robe together. Now you can cut along those markings to achieve a neckline that won't peek out from under your upper garments. If the markings are angular anywhere, cut the angle rounded. If that means to cut away more than was marked, do it. In fact, it's always preferable to cut the neckline larger rather than smaller. The stays will hold the shift in place, so you'd have to cut away quite a lot before the neckline is too deep. Either turn the neckline edge very narrowly or attach a bias strip that is then folded to the inside to neaten up. Make sure you leave a small tunnel into which you'll insert a drawstring that goes from the shoulders to the centre front, where it surfaces. The drawstring isn't mandatory, but it allows you to adjust the size of the neck opening.
 This
is it for a plain chemise. But in the 18th century, for upper-middle and upper
class, there was more...
This
is it for a plain chemise. But in the 18th century, for upper-middle and upper
class, there was more...
A working-class shift wouldn't have any embelisshments besides possibly a cross-stitched monogram and number. Actually that wasn't really an embellishment but an insurance: Many lower and middle class people didn't own multiple large wooden tubs and even if they did, they didn't have the space to store them. So they did their laundry at public laundry rooms, possibly along with other people, so the laundry could become mixed up. The monogram was your ownership mark, and the number to help keep track of which shirts went to the laundry room and which came back. Wealthier people outsourced the washing and used the marks to make sure that the washerwoman hadn't kept some pieces of laundry.
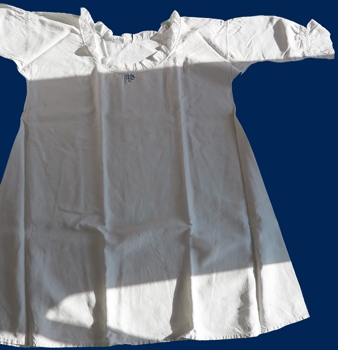
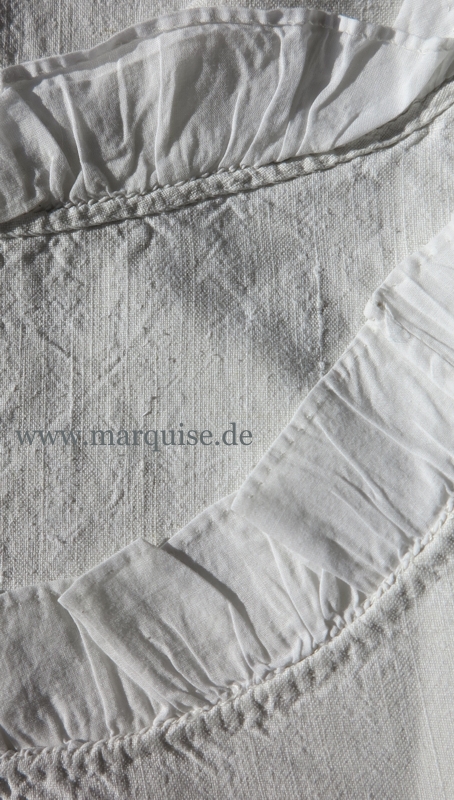
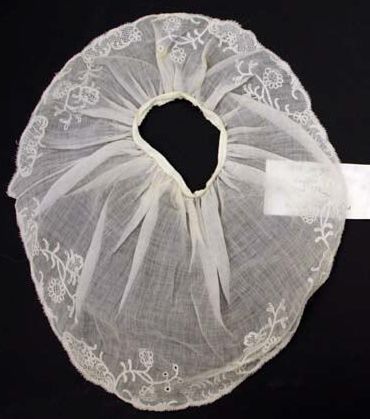
 A
middling shirt could have batiste or lawn ruffles along the neck opening and
at the elbows. The pic to right e.g. shows a chemise of not-too-fine linen with
a lawn neck ruffle, the kind the middling sort would have worn. The well-to-do
townswoman may have had one set of lace ruffles for special occasions, and maybe
two- or three-layered lawn ruffles as a step up from single-layer work-a-day
ruffles. To afford bobbin or even needlepoint lace for wear on a normal week-day,
you had to be rather rich.
A
middling shirt could have batiste or lawn ruffles along the neck opening and
at the elbows. The pic to right e.g. shows a chemise of not-too-fine linen with
a lawn neck ruffle, the kind the middling sort would have worn. The well-to-do
townswoman may have had one set of lace ruffles for special occasions, and maybe
two- or three-layered lawn ruffles as a step up from single-layer work-a-day
ruffles. To afford bobbin or even needlepoint lace for wear on a normal week-day,
you had to be rather rich.
No matter what the material, the neck trim should be 1.5 to 3 cm wide. The elbow trim (engageantes) can be one strip of 10 to 15 cm all around, or shaped so that it was shorter at the bend of the arm and long at the elbow, much like the sleeve flounces of a Robe à la française.
 |
|
Dresden lace engageante (c) Metropolitan Museum of Art , Inv. 1975.34.5ab |
As the shift is worn directly on the skin, it will need washing often, so the engageantes should be removable. The narrow lace at the neck, unless it's very delicate and/or precious, can be washed together with the shift. The engageantes, however, would at best crumple up and be hell to iron, at worst be destroyed. After gathering the engageantes, fold a strip of fabric or preferably tape in half and attach it over the gathered edge as you would a skirt waistband. Lightly baste that band to the sleeves so that you can easily remove the lace for washing. That way you can also move a set of ruffles from one chemise to the next rather than having to make one set per chemise.
What kind of lace is suitable, anyway? It's hard to find suitable modern lace that doesn't look completely artificial, plastic-ish. Embroidered tulle lace made of cotton is not really authentic, but it looks halfway OK from a certain distance and in poor light. Plain or embroidered linen or cotton lawn (as fine as possible) is authentic, whereas so-called cotton lace (i.e. batiste with round embroidered holes ) is not. You might also be able to find machine-made bobbin lace in the Valenciennes or Mechlin style which looks very authentic to anyone but a lace fancier who leans really close. The best option is of course real handmade bobbin or dresden lace, and depending on the ebb and flow of the antique lace market, it's not necessarily the most expensive one. See also: the lace page.
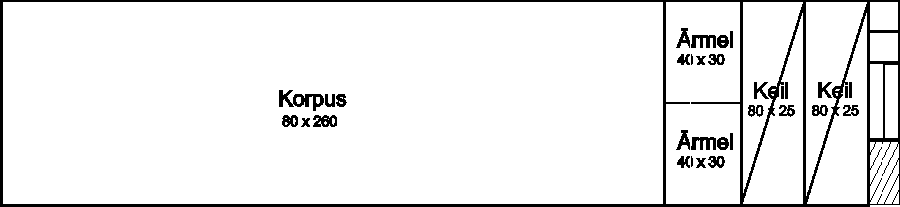
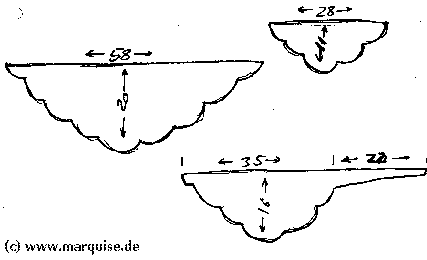
There are other, slight variations among the patterns I know - mainly in how the body and gores are cut - that are mainly due to differences in the fabric widths available. One always tried to make as much of the fabric as was possible, wasting as little as possible. I would therefore choose the pattern so that it makes the most of my 140 or 150 cm wide fabric, rather than according to whether it's documented for the region/period I'm aiming at. It's simply true to the economical spirit of the age - and better for my wallet, what with the linen prices today.

The above patterns are taken from Garsault's
"L'art de la lingère".
Variation B is called à la française and requires a 120
cm wide fabric which is cut in half lengthwise to form the 60 cm wide body,
so there is a shoulder seam. The gores are rather wide at the hem end.
The left one (A) is called à l'anglaise and requires a 80-90 cm wide
fabric. The body is 60 cm wide at the shoulders and cut diagonally up to a point
halfway between shoulder and seam. The wedges thus removed are attached to the
lower half of the body to form the gores.
Variation C is also à l'anglaise, but in this case, the body is cut straight
(or rather, the selvedge is left straight) on one side, whereas the other
side is cut straight from shoulder to below the arm, and then diagonally all
the way to the other selvedge. The wedge thus cut away is attached to the straight
edge.
All these shifts are 60 cm wide at the shoulders. This means that variation A is best suited for large-breasted figures because the slant start right at the shoulders, i.e. the shift is wider than 120 cm at chest height. C is suitable for the average figure, whereas B is still only 120 cm wide at chest level and therefore for petite figures.
Content, layout and images of this page
and any sub-page of the domains marquise.de, contouche.de,
lumieres.de, manteau.de and costumebase.org are copyright (c) 1997-2016 by A. Bender. All rights
reserved. Reproduction prohibited - exceptions see Copyright Page.


This work is licensed under a Creative Commons License.