| INDEX | 1300-1599 | 1600s | 1700s | 1800s | 1900s | CROSS-ERA | ETHNO | |
| MISCELLANY | CONTACT | SEARCH | |
The following instructions and pattern diagrams were taken from Garsault's L'art du tailleur, published in the 1760s. The numbering of the paragraphs and the unusual measurement units were taken over from the original; I have even tried to preserve some of its roundabout way of expressing things. I have added the centimetre equivalents in brackets. Since the instructions mystify many a modern reader, I have added my own instructions (based on Garsault's but hopefully clearer) on the right-hand side. Pictures can be enlarged by clicking on them.
|
273. Man's shirt, fig. BB, plate III. One needs, for a normal size, a fabric of two Tiers [80 cm], & for a stouter man a fabric of three Quarts [90 cm] width; apart from that, the yardage, cut and technique are the same for both. The sleeves usually require half an Aune [60 cm], as wide as the fabric is; the body is made from what is left when the sleeves have been cut: About one Aune [119 cm] in length, the fabric being doubled breadthwise. 274. The accessories, viz., the collar, two shoulder pieces a a, & their gussets, two underarm gussets b b, zwo gussets for below c c, & the breast heart d, are taken from the fabric in one of two manners, as will be explained. For a half dozen shirts you need 17-18 Aunes [20.2-21.4 m]; seventeen if the accessoires are taken from the side of the sleeve, eighteen if they are cut extra. 275. Taking the accessories from the side of the sleeve. It is done thusly: When you have taken your 17 Aunes of fabric, start by cutting off 6 Aunes [7.13 m] for the 6 pairs of sleeves. From these 6 Aunes cut off 5 Pouces [13.5 cm] from one side, which will be enough for the accessories for the six shirts; the rest of the fabric, divided by six, will become the bodies of the shirts. 276. Taking the accessories from 18 Aunes. Strart by cutting off one Aune from one end and putting it aside for the accessories. The Rest is divided as before. The only difference is that the sleeves in the first case are by 5 Pouces narrower than in the latter. [...] |
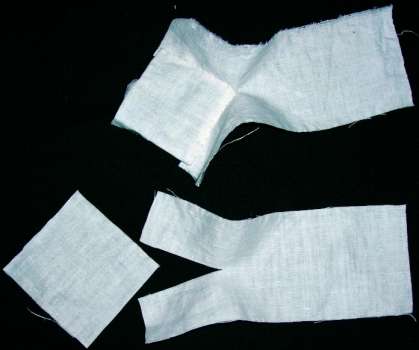
Both with men's and women's shirts, fabric economy was very important. Garsault doesn't dedicate four pragraphs to it for nothing. This is also the reason why the body size hardly plays a role: A normal man gets a 160 cm wide shirt because most fabrics were 80 cm wide, a large one gets 180 cm (made from a 90 cm wide fabric), and that's it. When sewing such a shirt, don't enslave yourself to Garsault's measurements, but enter into the spirit of the age by adjusting them so that you get as much out of the fabric as possible. Most linen fabrics nowadays are 150 cm wide. My suggestion: cut off an 80 cm wide strip lengthwise for the body. Cut 2 x 60 cm off the remaining 70 cm wide strip for the sleeves. The rest goes into cuffs, collar and other small pieces. What Garsault suggests under 275. is basically the same thing: To save fabric, he makes the sleeves only 70 cm wide instead of the whole fabric width (see 273 & 276). This also tells us that 60 cm are the sleeve length, while 70 (or 80) are the width. How much fabric you need depends on how long the shirt is. According to Garsault that's 120 cm, i.e. the shirt reaches to about knee level. So in case of 150 cm wide fabric, you need 2.4 metres and will, after having cut the sleeves, have about 1.2 metres left of the 70 cm wide strip for small parts. So, to sum it up, you cut:
No allowances besides the ones mentioned. |
|
277. Making. To make a shirt, start by preparing the sleeves in such a ways that all that remains to be done is to affix them in their place. To do so, first close the lower seam which connects both sides; they are made overhanded and felled; one leaves open two Pouces on one end and three on the other: The two puces [5.5 cm] are for the underarm gusset & the three Pouces [8 cm] for the slit e e. Now the underarm gusset is inserted; it is in the shape of a diamond & it is attached to the sides of the opening from corner to corner; the other half of the diamond is attached to the body when the sleeve is affixed. 278. The slit which ends in the cuff and remains open is neatened with two strips. 279. The underarm gusset b b which was mentioned before is a small rectangle of zwo Pouces [5.5 cm] which is folded and overhanded from the inside. |
You may ask yourself whether the measurements are not a wee bit excessive. Well, we are told that the shirt was pulled through between the legs to double as knickers. Feel free to make the shirt shorter, but leave the width alone. When the shirt is finished, it won't seem all that wide even on a slim man. Actually, since men in Garsault's time tended to be smaller overall, you should consider making the shirt even wider for a stout man – and I'm not using the term as a euphemism for "fat". The seams should be flat-felled ones. Garsault sometimes whipped seams (e.g. for the sides of the body and the legthwise seams of the sleeves) because he's normally using the full width of the wide fabric, i.e. he's dealing with selvages. If you're lucky enough to be using such narrow fabric, go ahead and whip the seams. But wherever a cut edge comes into play, a flat-felled seam is preferable. The sleeves are put together as described for women's shifts (see there). One exception: At the wrist end, leave the seam open for about 8 cm. Narrowly turn the edges of the slit twice and seam them. You could also attach a narrow strip with turned-under edges to each side. I've made the underarm gusset a little bigger than Garsault says because with his 5.5 cm square, you'd have to work with extremely narrow allowances if you want to have any gusset left after felling the seams. I've done the same to some other small pieces for exactly the same reason. Where I didn't, I've found the piece large enough as it was. |
|
280. The shoulder pieces a a are usually made 6 Pouces [16 cm] long & two Pouces wide; the piece is cut open 3 Pouces deep along the middle from one side in order to fill the slit with a square gusset of the same length which is attached in the same way as the underarm gusset; the other half is also attached to the body later. When you have marked the middle of the body with a fold or by some other means, make a slit downwards, six Pouces long: This opening is called breast slit. From the breast slit, make another slit to the right & left along the fold, unto six Pouces from each edge. Into these the shoulder pieces a a are inserted, which are attached with backstitches after you have folded the edges over narrowly. |
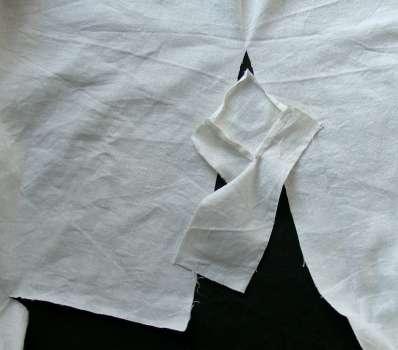
The shoulder pieces are strips that run along the top of shoulder from the collar to the sleeve seam. They protect the shoulder from abrasion and deformation and also take strain off the neck gusset. Make a 6 cm long slit along the lengthwise middle of the shoulder piece. Insert one triangular half of the neck gusset into that slit with a simple backstitch seam. The other half will later be inserted into a similar slit in the shirt so that you will end up with a doubled triangular gusset where the shoulder line meets the neck. Since no neck opening is cut out, it is the gusset that gives the neck room. Some illustrations:
|
|
281. The little breast heart d on the breast slit, is a small square of two Pouces cut into the shape of a heart; the edges are folded narrowly all around, then it is set exactly onto the end of the slit from the outside, the folded edges facing the fabric onto which it is sewn, and attached all around with slip stitches. |
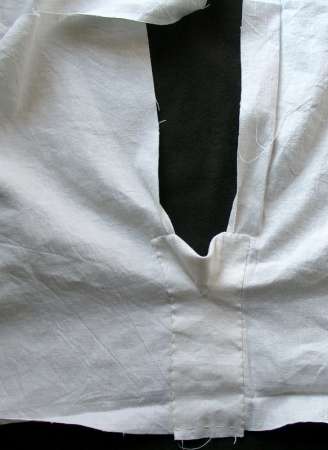
Now for the body. Fold it widthwise so that the back is 8 cm longer than the front (see 286.) Mark the fold (=shoulder line) with tailor's chalk or the like. Fold again lengthwise, front of the shirt outside, and mark the new fold. Unfold. From the shoulder line, cut 16 cm downwards into the front of the shirt. This will be the chest slit. From the chest slit, cut a 30 cm long slit along the shoulder line on each side. The slit should stop about 10 cm from the sleeve. Insert the other half of the shoulder gusset into the end of this shoulder slit, the seam allowance facing outside, then flip the shoulder piece down onto the shoulder line, thus folding the gussets in half diagonally. The shoulder piece must lie exactly along the shoulder line. Turn the edges of the shoulder piece under and seam them onto the body. The end that faces the shoulder seam can be left as is. Narrowly turn the edges of the chest slit twice. Attach the chest heart as described under 281. on the left. The "heart" protects the slit end from being ripped open. An alternative period technique is to span 2-4 passes of linen thread between the slit edges, about 1 cm above the slit end, and wrap this bridge with buttonhole stitches as if you were making needlepoint lace. |
|
282. To return to the sleeves, attach the cuffs to them. An exact rule cannot be given for the circumference of them, neither for their width; some want them wider than others. However, half a finger's breadth is customary; as for the circumference, it is said that if you divide the neck circumference by three, you will get the cuff circumference; but it is better to measure the wrist. The first thing you do is to fold the fabric in half lengthwise & on the half that you have intened for the outer side you draw, sew or embroider a pattern of your liking; then the cuff is ready to be attached to the sleeve. To this end, the ends of the sleeves are gathered, then inserted into the folded cuff where it is attached with slip stitch, threading the needle through one sleeve fold with each stitch. Then the fabric of the other side of the cuff is attached likewise; it is enough to stitch though every second fold. At last, a button hole is made into each end. [...] 285. The collar is a pieces of fabric of about 14 Pouces [38 cm] length and five Pouces [13.5 cm] width; it is folded in half lengthwise so that the collar is two and a half pouces [7 cm] high. [minus the folded-under edges that he's forgetting again] It is attached to the shirt in the same manner as the cuffs before. [ I.e. the shirt edge is also gathered.] 286. N.B. The front hems of men's shirts are made shorter than the back by a Seizième [7.5 cm]. [ I.e. if you're thrifty as you should be with good shirting linen, you don't fold the shirt body in half widthwise, but so that the front is shorter right from the start. ] |
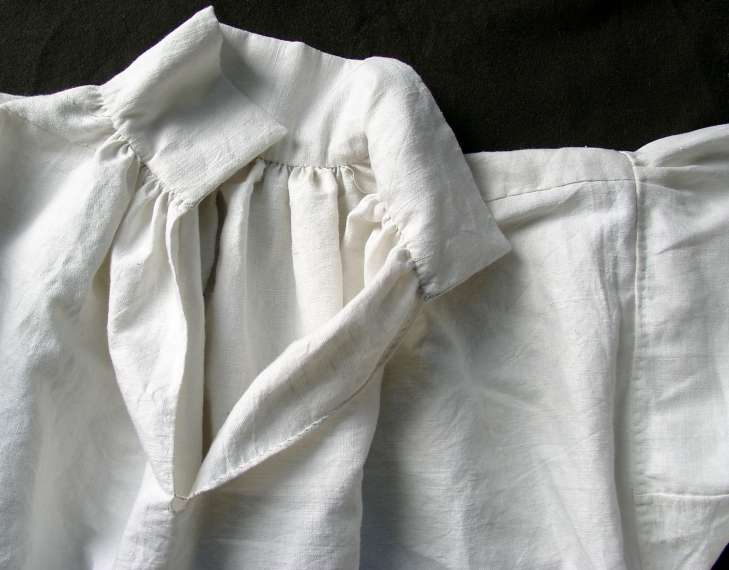
The collar is 14-16 cm wide and as long as the neck circumference requires. As the circumference is usually measured somewhere above the place where the neck opening of the shirt will be, some allowance should be added. Together with the allowance needed for buttoning, it usually comes up to 4-5 cm, plus seam allowance. Fold lengthwise and sew shut along the short edges. Turn inside out ande turn edges under. Mark the middle, fold ends toward the middle and mark those new folds. These marks will tell you where on the shirt each part of the collar should be attached: The middle to the centre back, the other two to the shoulder line, and the front edges, of course, to the edges of the chest slit. Mark the centre back of the shirt as well. The shirt edges that form the neck opening are now gathered until they fit into the collar. The marks you've just made on the collar will help you to distribute the gathers evenly all around. Stick the gathered edge between the turned-under edges of the collar and seam the collar edge to the body once from the outside – one stitch per pleat – and once from the inside, with one stitch per two pleats. One end of the collar gets two thread buttions, the other two buttonholes. Illustration: Finished Collar-shoulder part (no buttons/buttonholes yet) Back to the sleeve. The cuff is attached to its lower end much like the collar: Fold cuff legthwise, sew short edges closed, turn, turn edges under. Gather sleeve end and stick into cuff. The sleeve ends are more likely to show than the collar, so take care to make the gathers even and to catch each pleat with one stich. The width of the cuff is a matter of taste (anywhere from 1.5 to 3 cm after folding in half and turning the edges), the length depends on the width of the wrist. Add allowances for buttoning and seams. Garsault recommends making a buttonhole in each end of the cuff to allow cuff links, but you can also attach thread buttons to one end instead. |
|
287. When the sleeves are finished, the body of the shirt is divided by folding it into three parts widthwise. The edges of the middle third are overhanded; into the upper third the sleeves are set, & the lower third remains open. Into the upper end of the latter the small gussets c c are inserted. Each of them is made of a small piece of fabric two Pouces square. When the hem and the slits have been neatened, the small gusset or rather half of it is, with folded-under edges, set into the ends of the slits as has been described for the shoulder pieces before; then fold the other half inwards and up and attach it with slip stitch: So the gussets are doubled. 288. Now the only thing left if to attach the sleeves to the body of the shirt. To do this, pleat the upper part of the sleeve into small pleats and at the same time overhand it to the opening. |
Now attach the sleeves. Gather or narrowly pleat the upper edge, where they meet the shoulder seam. Garsault's instructions as to how wide the sleeves should be after gathering are somewhat unclear and can't be right, at leat not the way I understand them. I suggest 35 cm, underarm gusset included. So you measure 35 down from the shoulder line and close the side seams of the body closed from there downwards. At the lower edge, leave a slit open trhe length of which depends on the legth of the shirt. Its upper end should sit at crotch height or slightly above. The slit gusset is set into the end of this slit: Fold it in half diagonally, attach one triangle to the end of the slit from the outside, as you did in the shoulder piece, fold the edges of the other half under, and seam-stitch the other half to the inside. Set in the sleeve and see to it that the end of the shoulder piece is caught in the seam. Turn the lower edghe of the shirt twice, seam – and the shirt is finished. At least, if it's a simple, workaday shirt. |
|
289. On sleeve and breast ruchings (Jabot). The sleeve ruchings of men are made from muslin or lace; they usually are from 15 Seizièmes to an Aune long [112-110 cm] and a seizième [7.5 cm] high. 290. The ruchings are attached to the cuffs of the shirt in two manners: Either they are attached permanently - in this case they go into laundry with the shirt - or they are only basted on. In the first case one starts by rolling the lower edge of the ruching, then one gathers them with a point de dessus which is a longer version of slip stitch. Then it is attached with slip stitch by takung up each fold as with the sleeve. [...] In the second case, i.e. in case of expensive ruchings like e.g. embroidery or lace, which one does not want to have laundered, they are sewn onto a linen tape which is basted to the cuff. 292. As for the jabot, it is attached to the front opening with slip stitch. It is laid into pleats in three places, viz., one and a half Pouces at the upper end of the slitz and two Pouces at the lower. |
In case of "better " shirts, ruffles of batiste, muslin or lace are attached to the cuffs and the chest slit. It is not necessary to reckon quite as miúch fabric for the wrist ruffles as Garsault does (21 x 60 cm). The fines the ruffle fabric, the more fabric can and should go into them. In case of lace, you depend on how much you've found, anyway - especially since the jabnot should be made of the same lace. The width should be 4 - 8 cm. Simple ruchings made of fine fabric get rolled edges all around, gathered along one edge to fit the legth of the cuff and attached with fine stitches. Lace is gathered and set into a fabric band that is as long as as the cuff is wide. The same goes for the chest slit. The band is then basted to the cuff/chest slit and taken off again for washing. |
Some remarks:
It is a widespread misapprehension that upperclass shirts were made of silk. Consider that back then, body hygiene wasn't taken all too seriously: You weren't considered clean if you washed every day, but if you wore clean garments. So the gentleman may have bathed once a week (or less, we don't really know), but changed the shirt on a daily basis - and had to do so, considering that a white shirt on a not-so-clean body doesn't stay white for long. With the period cleaning agents, the laundry had to soak for a long time, then be scrubbed vigorously to get it white again. Most silks, especially the thin ones generally associated with shirts, wouldn't survive a single scrubbing. Moreover, laundering was a major event that took two or three days - commoners' households temporarily employed outside laundry maids* - and therefore didn't take place all that often. The gentleman, therefore, had to have one or two dozen shirts to make it from one laundry day to the next. According to Garsault, that's 43 metres for a dozen shirts. In today's prices, that quantity of silk costs about 600-800 Euros, which is a shocking amount all by itself, but even more so if you consider that in the 18th century, fabric in general was more expensive in relation to the overall income than it is today. By a rough estimate, a dozen silk shirts were about as expensive as four or five brand-new computers or a year's rent for a 1KB apartment on the outskirts of Tokyo. And remember that due to the strain of laundering, those shirts wouldn't last long.
So, from the lowliest peasant to the highest nobility, shirts (both men's and women's) were generally made of linen. It was the traditional, approved material for underclothes, durable, versatile and comfortable. Social differences were reflected in the degree of fineness of the thread on the one hand, and the colour on the other: To achieve snow white, the linen had to be repeatedly bleached in a time- and labour-consuming process, i.e. the whiter the fabric, the more expensive it was. Lawn was considered fine, but according to contemporary sources (e.g. Tom Jones or Moll Flanders), holland was the best. The wealthy may have had shirts made of cotton which was - outside the North American colonies - relatively expensive.
Source: de Garsault, M. L'art de la
lingère. Neuchâtel 1780 (reprint of the original, 1769)
*) Zimmermann, P. Die junge Haushälterinn, ein
Buch für Mütter und Töchter. Basel, 1792
Content, layout and images of this page
and any sub-page of the domains marquise.de, contouche.de,
lumieres.de, manteau.de and costumebase.org are copyright (c) 1997-2022 by Alexa Bender. All rights
reserved. See Copyright Page.

GDPO


This work is licensed under a Creative Commons License.
