| INDEX | 1300-1599 | 1600s | 1700s | 1800s | 1900s | CROSS-ERA | ETHNO | |
| MISCELLANY | CONTACT | SEARCH | |
|
|
This is for both solution (2.2.1) and (2.2.3), with the difference being in the authenticity of the material used. I'm still in the process of trying this method myself. I strongly recommend that you make and wear a simple pair of stays based on the same pattern before you attempt this one, to make sure that it fits comfortably before investing the amount of time requird for this one. In the follwing instructions I accordingly assume that you don't have to do any fitting anymore.
Make up the foundation the same way as the basic (2.1) corset. However, give a little more seam allowance than normally: The fabric will bend around each bone, which wouldn't make much difference in the half-boned variety. Here it adds up so that the panels will shrink at right angles to the direction of the boning - i.e. in width. It's enough to lightly baste the boning into the foundation as it will be held by more stitching.
If you're aiming for solution (2.2.3.), steel or plastic boning should be avoided as it's too wide. Period boning was 2-4 mm in width. Try cane, horn or wood. 2-4 mm wide steel may work - I haven't tried. All-over Spanish (peddig) reed boning is way too weak.
We are now going to mimick the authentic stays where many, many bones were inserted into narrow tunnels done in backstitch. The tunnels must be done by hand as machine stitching wouldn't look right, so it will cost you upwards of 300 hours of work - now is the time to revert back to half-boned if you don't want to invest that much.
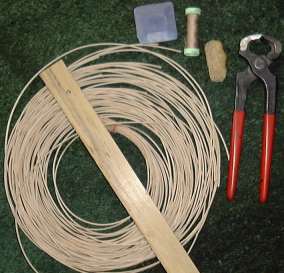 |
This is what I used for my project: 2 mm diameter Spanish reed, a ruler for the guidelines, tailor's chalk, silk thread, a cake of beeswax, tongs for cutting the reed and - not in the picture - an awl. And needles, of course. Then I got myself a "magic" pen for silk painting - the lines will vanish all by themselves after a day or two. Much better than the chalk, which makes wide lines and tends to fade too quickly. |
When the main bones are in place between the two layers of foundation, see to it that all thread ends are on the lining side, then put the top fabric onto the foundation and hold it in place with basting. See to it that it lies smoothly and don't stretch it. This will work best if top and foundation have the same give, which is rare. More likely, the top will tend to buckle. A relatively thick top fabric, such as wool, will cover up the buckling problem. Generally, thick, dull top fabric is easier to work with than fine, shiny fabric: Mistakes and slight buckling are less obvious.
Now go around all the bones in backstitch. When the main bones are outlined, it's time to see to the narrow bones. In contrast to the wide main bones, it is better to make tunnels first and insert the boning later. The tunnels should be wide enough that the bone can be inserted easily, but not so wide that it can move around within. For 2 mm Spanish reed, the ideal width would be 4-6 mm.
Before you start, draw a sketch of how the boning should lie, of unboned areas and of stitching designs to fill the space in between in case you're going to leave any. You can draw that design directly onto the inside of the foundation as you'll need to cover it with lining anyway. Whether you place the cane strips side to side to achieve a solid look or let it fan out is at your discretion. The former means fewer stitching -> less work.
The stitching on extant corsets exhibits a high degree of precision which is the main thing that makes us gasp when looking at it. The more precise your stitching, the more authentic it will look - and the larger the envy factor. ;) Of course, there must have been other, cruder corsets done by less experienced persons, and surely the ones we see in museums survived because they were top quality, therefore treated with care. Which is to say: Don't be too ambitious! Less-than-perfect stitching is fine. Draw a chalk (or magic pen) line for each row of stitching and follow it exactly - it's awfully difficult to sew straight without a guideline. Try to make stitches of even length.
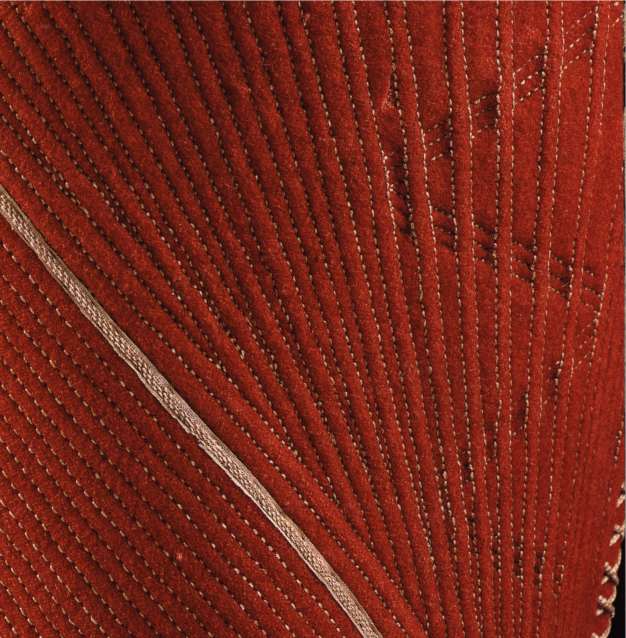
Here is a picture as a guide and inspiration - it's extracted from the wonderful book "Historical Fashion in Detail". Note the thickness of the thread, the tinyness of the stitches, how they sink into the soft wool. Note also how the space between the fanning-out bones is filled with a zig-zag design that mimicks tunnels.
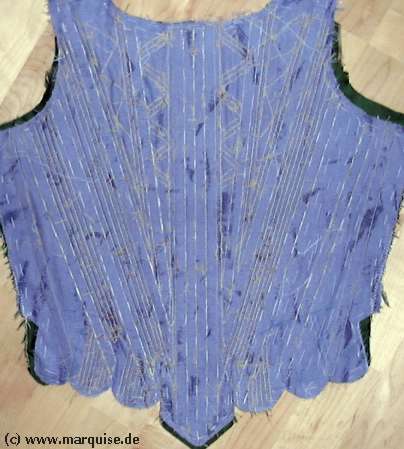
Here are two more pictures, of my latest project:
The inside of the almost finished back panel, a complete
mess of thread ends and tangles. Notice the stitches (in white) that hold the
wide bones between the two foundation layers. In gold, the stitching done through
the top layer as well.
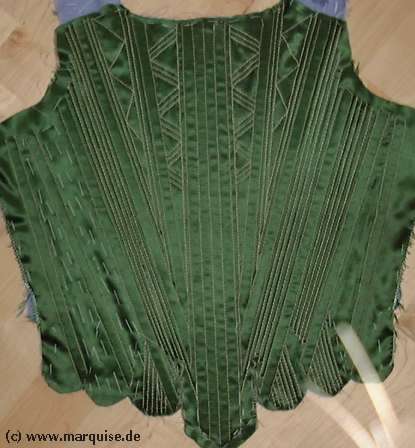
Here is the outside. Note how the shininess of the
fabric overemphasises any little buckling. To the left, you can still see the
white basting that keeps the very stretchable top fabric from moving against
the foundation while I work. It's removed when the stitching for the narrow
boning is done.
Before inserting the cane or reed, it should be soaked in water for a while, then left to dry off and finally, pulled over the wax cake. Waxing smoothes down the fibres and prevents the cane from drying out too quickly, i.e. from becoming brittle.
When all the cane is in, sew the panels together, make up the lining and place it onto the inside, smooth it out, and baste it on along the edges. Cut the tabs with rounded ends, including the tab on the front panel where the shoulder strap will attach. Finish up by binding the edges of the combo e.g. with bias strips of the top fabric, bias tape, or fine leather. Remember to attach the shoulder straps before binding the upper edge. See "main" stays page.
I've left out the lacing holes until now as I'd assumed you wouldn't have to put on the stays for fitting. (Remember, I recommended you make and wear simpler stays first to see if the pattern is OK for you.) See "main" stays page.
Content, layout and images of this page
and any sub-page of the domains marquise.de, contouche.de,
lumieres.de, manteau.de and costumebase.org are copyright (c) 1997-2022 by Alexa Bender. All rights
reserved. See Copyright Page.

GDPO


This work is licensed under a Creative Commons License.